Tuesday, November 11, 2008

People are always asking me if I make rings

And in the past my answer has been "no". I have done some very simple styles with a few twists of wire and some inexpensive stones. But up until this point, I have not made anything that I would seriously consider offering to someone else.

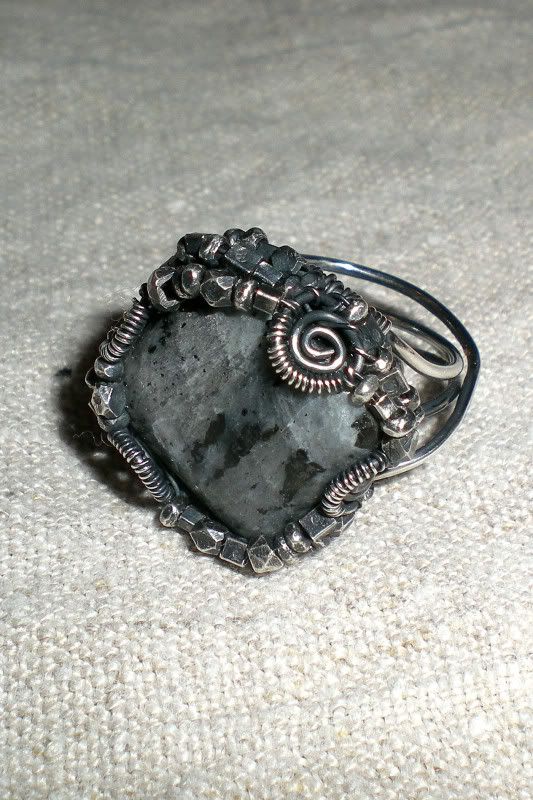
So this is an adaptation of the Ornate Ring tutorial from Eni Oken. This is a practice piece in preparation for the final piece for someone who ordered it sight unseen when they were ordering other commission pieces.


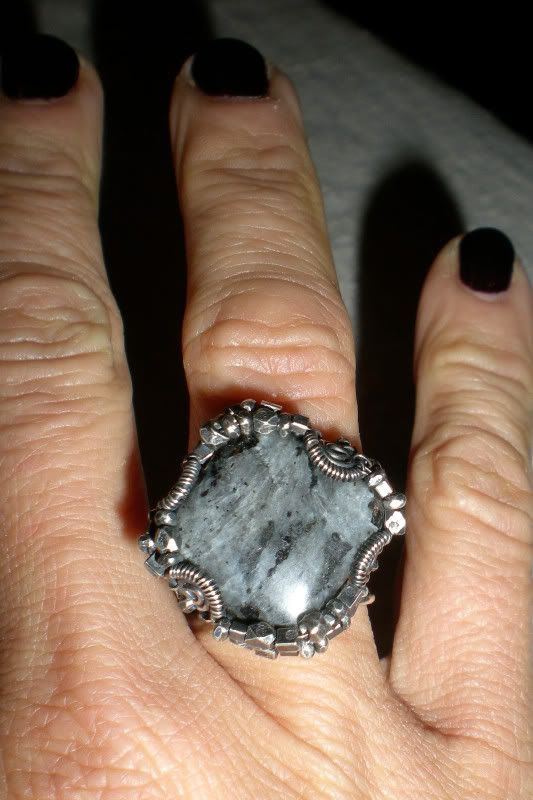
Since I have done very few rings, I needed to make a piece and wear it so that I would get a feel for the construction process and how the ring wears. Rings are trickier than other things to construct for at least two reasons. The first is that rings are very size specific. So getting the wire to the correct size can be a little challenging. Then rings have to be able to withstand quite a bit of impact and general abuse, since they are moving about with the hand. So they have to be made with a fair amount of structural integrity.

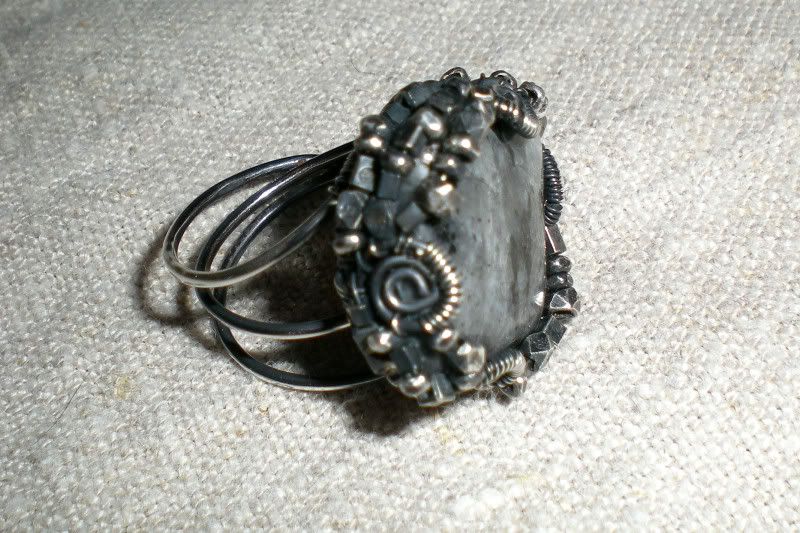
This ring is basically constructed in three phases. First the part that encircles the finger and the base upon which the stone sits is bent into shape. Then coiled pieces which help to hold the stone in place are constructed and wired to the base. Finally the sides of the ring are created by wrapping thin gauge wire around the spirals, interspersed with the sterling studded detail.


The stone in this piece is a Norwegian Moonstone. I antiqued the piece to highlight the detail, complement the darkness of the stone, plus I feel that this style lends itself to an antiqued look.

Since I have worn this piece, I now know that the final product that I will be making soon will have to have a total of four curled wire pieces, one at each corner. This ring was constructed with two. The problem with this design is that the longer sides where the thin wire is longer moves around too much. This makes me concerned that the wire could weaken and break over time with wear. So I will modify the design for that.

All in all, this is a nice dramatic occasional wear sort of ring.

Saturday, October 11, 2008

Long, detailed, and fabulous

During the Artoberfest Art Fair a couple of weeks ago, I made a new acquisition to my jewelry collection. This is just one of the gorgeous Angela Caldwell pieces that I own.


I just picked up the necklace yesterday. I had admired this necklace several weeks ago at another Arts District function. I love the components of this piece: the beautiful pendant which showcases Angi's latest PMC work with gold stud cold connections and hammered details:


I am also pretty crazy about the really nice faceted rutilated quartz gemstones that attach the sterling chain pieces along with the silver bar triplets interspersed in the design:


I had picked it up, tried it on, and put it back down because while I loved the details of the piece, it just didn't lay in the right spot for me. The pendant hit right between my cleavage. At Artoberfest the piece was there again, and I went through the same process. I thought about it and finally asked Angi if she would be able to add length to the necklace. I thought that this piece would look great in a super long length. So she added eight inches for me, which makes the necklace 32 1/2" long. It will also look wonderful doubled, as she left the toggle clasp in the final version.

You can view other more pieces by this artist at http://www.angelacaldwelldesigns.com/

Monday, October 6, 2008

Rocks that I picked up in Williams AZ


I picked these rocks up in Williams, Arizona, on Route 66. In the top left corner are desert rose pieces; three small and one large. Then on the right side are petrified wood pieces. The blue piece in the middle is raw kyanite. To the left of it is a quartz crystal.

Wednesday, October 1, 2008

Part 2 of a Beach Glass Commission


This is part of the same commission as the previous piece. It is shown on the same necklace cord. That is part of the beauty of that design, is that the pendants are interchangeable.


I varied the technique on the netted bezel design and added sterling beads to the top row.


This is a picture of the back frame of the piece.


Detail picture of the side wire netting that encircles the piece.

Sunday, September 28, 2008

Part 1 of a Beach Glass Commission


This is part I of a multi-piece commission that I am working on. This is the first time that I have ever taken a piece of beach glass and drilled it briolette style. This piece of glass is thick enough to allow the drilling to be done. I drilled it first on one side half-way, then came in from the other side half-way.


The wire work is adapted from a free tutorial by Eni Oken at http://www.enioken.com/jewelry/036briowrap.pdf

The pendant is then paired with a doubled leather cord with a wrapped clasp that matches the detail of the wire wrapped pendant detail.


One of the advantages of this method is that the cord itself serves as part of the clasp of the necklace. The other advantage is that it allows for interchangeable pendants. This is a technique that I evolved myself. I usually use thinner leather than what is used for single strand necklaces, for a better looking and hanging necklace.


This necklace is about 16 1/2" long.

Friday, September 26, 2008

Modifying a custom bracelet to make it longer


This is a multi-strand bracelet fashioned out of sterling silver. Amethyst, lapis, rough sapphire, Tibetan quartz crystals, freshwater pearls, abalone and sterling pieces make up the "charms" of the bracelet.

This bracelet was commissioned by my brother for his girlfriend. He gave me a budget and then let me design the piece according to what I already know about her style.

It didn't take long at all for the design of the piece to come together. I knew right away that I would be working with deep blue and purple hues. She has blue eyes that seem to verge on indigo to me. She favors deep hues in her dress.

There is a very oceanic quality to the piece, deep inky water under a waning moon.

When she got the bracelet, it turned out that it was not quite long enough. A charm bracelet needs to have a little space and movement on the wrist. And Amber is a little bigger boned than I. So I had to make it longer in such a way that it would be integrated into the design of the bracelet without looking "added onto". This is the piece as it was originally designed:


I decided to to lengthen it with the same materials out of which the dangles of the bracelet had been made. The pearl had to be drilled to make the hole bigger to accommodate the 22 gauge wire. Then I put the nice Tibetan quartz crystal on the other side. Then so that the links transition well with the rest of the design of the bracelet, I added the respective rough sapphire and amethyst dangles at each side.

Wednesday, September 24, 2008

Trading baubles for other baubles


Sunday at the Artoberfest Art Fair, I scored a couple of new rings from another artist who was also at the fair. Her name is Christina Root and she has a shop at www.christinaroot.etsy.com. I first found the black goddess ring, then at her urging, I also selected the red raku ring. She then picked out a pair of earrings that I had made in exchange for the rings. Artist barter is awesome! It allowed me to expand my collection of big fabulous rings.

Monday, September 22, 2008

A profile in creative challenges


This necklace was a special commission for a friend. She had the teardrop shaped stone (amethyst, I am pretty sure) that was mounted in a very simple four-prong gold frame for a necklace. This is a piece with sentimental value to her, as it was given to her by her grandmother. But she wanted something original done with it, since it was a very standard (read boring) setting for the stone.

I took the stone out of its setting and it sat on my bench in my studio for a while (ok, a long while) as I worked on other things. Then one day as I was glancing at it, it occurred to me that the stone has a face profile carved into the side of it.


I thought that the Net Bezel Pendant design from Eni Oken (www.enioken.com) would be the best way to work with the piece. I had already done one piece with this design and really liked the results. The only thing was that I did not want to cover the profile of the stone with the wire netting. So I really had to think about how I would resolve that design issue.

I finally decided that I would wrap the netting wire around the wire of row that sits flush with the edge of the pendant on the profile edge. This would serve two purposes: Make the transition to the next row and also create an asymmetrical effect that would help to draw attention to the profile. Then when I finished the pendant, I reinforced the asymmetrical nature further by coiling the bail detail at different levels. It also makes the setting more secure.

I consulted with my friend and she decided that she wanted a long (24”) necklace out of doubled sterling chain. This really accentuates the nice vintage look of the wire pendant work.

This project is a great example of how design challenges are great opportunities for design innovation.